Azure Data Factory Metadata-Driven Copy Task
Published: 2022-12-03
Azure Data Factory (ADF) supports pipeline parameterization, allowing you to build generic pipelines and pass dynamic values at runtime. Almost all ADF components support parameterization, including linked services, pipelines, datasets, data flows, and activities.
With parameterized pipelines, you can reuse the same pipeline to move data between multiple sources and destinations, provided the configured linked services can access those data sources.
There are several ways to pass values to a pipeline when triggering it:
- Storage event trigger: Create a storage event trigger and pass relevant information through the event. The pipeline can retrieve the blob metadata and use it to connect to the storage account and read the corresponding file.
- Custom event trigger: Create a custom event trigger and pass the required values through an Event Grid message.
- Schedule or tumbling window trigger: Trigger the pipeline on a schedule and have it retrieve configuration values from an external source, such as Blob Storage, Table Storage, or SQL Server.
Although these approaches provide flexibility, they require you to manage the metadata storage, implement activities to retrieve the configuration, and build the orchestration logic yourself.
Metadata-driven copy task
Azure Data Factory provides an out-of-the-box solution for this scenario: the Metadata-driven copy task.
The feature was available in preview for some time before becoming generally available (GA), making it suitable for production workloads.
The underlying concept is similar to a custom metadata-driven pipeline:
- Store the configuration metadata in a central control table.
- Use an orchestrator pipeline to read the metadata.
- Execute the required copy activities based on the configuration.
- Reuse the generated pipelines to copy data across multiple sources and destinations.
The difference is that ADF generates the required pipelines and manages much of the orchestration for you. You can configure the entire process through Azure Data Factory Studio using the Metadata-driven copy task.
In this article, I’ll demonstrate how to use this feature to copy data from an on-premises SQL Server to Azure Data Lake Storage Gen2 (ADLS Gen2).
Prerequisites: This tutorial assumes you are familiar with creating linked services in ADF to connect to an on-premises SQL Server and ADLS Gen2.
If you need help setting up connectivity to an on-premises data source, refer to Microsoft’s Copy data from an on-premises SQL Server to Azure using the Copy Data tool tutorial.
Step 1: Create a linked service for the control table
The metadata-driven copy task stores its configuration metadata in a control table.
The control table contains metadata represented as JSON objects across multiple columns. ADF uses this information to determine how to execute the copy operations.
As of December 2, 2022, ADF supports the following database platforms for hosting the control table:
- Amazon RDS for SQL Server
- Azure SQL Database
- Azure SQL Database Managed Instance
- Azure Synapse Analytics
- SQL Server
Important limitation: The metadata-driven copy task does not support parameterized linked services for the control table connection. Therefore, you must create a dedicated linked service to connect to the control table database.
This is worth keeping in mind if you intend to use the same SQL Server instance for both your source data and the control table.
Step 2: Create the metadata-driven copy task
Before starting, make sure you have the following linked services configured:
- A linked service to connect to the source SQL Server.
- A linked service to connect to the destination ADLS Gen2 storage.
- A linked service to connect to the database that will host the control table.
Navigate to the ADF Studio home page and select Ingest.
On the Copy Data tool page, select Metadata-driven copy task as the task type.
Properties tab
This tab allows you to configure the control table and the trigger type.
- Select the linked service for the database that will host the control table.
- If you haven’t created the linked service yet, create one from this screen.
- Provide the schema and table name for the control table.
- By default, ADF creates a new control table. If you already have an existing control table, uncheck Create new table and select the table from the dropdown.
When you uncheck Create new table, the schema and table name textboxes are replaced with a dropdown that allows you to select an existing table.

Select the trigger type based on your requirements. For this example, I’ve selected a scheduled trigger.
Click Next.
Source tab – Dataset
Configure the source dataset that ADF will use for the copy operations.
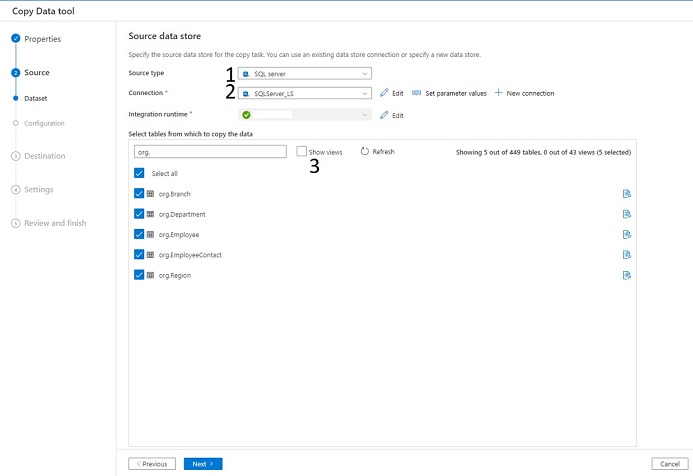
- Select SQL Server as the source type.
- Select the previously created SQL Server linked service as the connection.
- Select the tables you want to copy. For this example, I’ve selected all tables under the
orgschema. - If you also want to copy views, enable Show views.
Click Next.
Source tab – Configuration
ADF provides two configuration options for defining how data should be copied.
1. Full load all tables
This option copies all the data from the selected tables to the destination. It is useful when you want to perform a full initial load without configuring individual copy settings for each table.
2. Configure for each table individually
This option provides more granular control over the copy operation. You can configure individual settings for each table, including:
- Isolation level.
- Data partitioning.
- Incremental data extraction using a watermark column.
- Data preview.
For this tutorial, select Full load all tables and click Next.
I’ll cover the Configure for each table individually option in a separate article.
Destination tab – Dataset
Next, configure the destination where ADF will store the copied data.
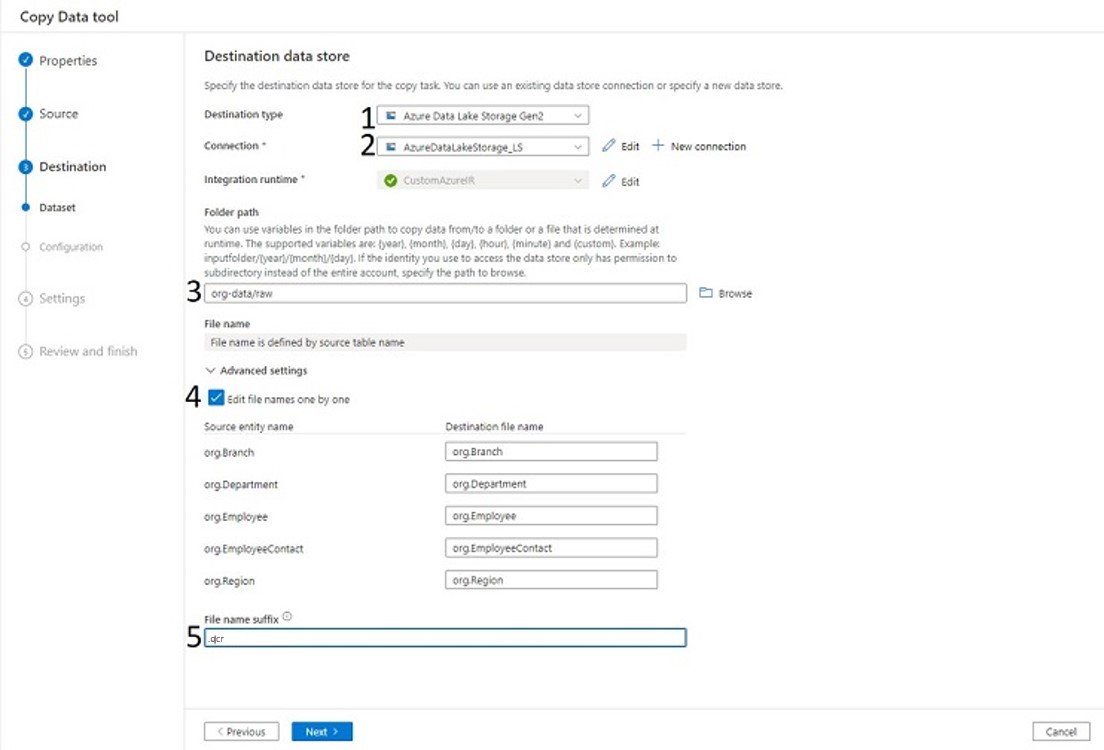
- Select Azure Data Lake Storage Gen2 as the destination type.
- Select the previously created ADLS Gen2 linked service.
- Browse and select the destination location in your ADLS Gen2 storage account.
- By default, ADF uses the source table names when generating destination files. You can override this behavior by enabling the corresponding option and providing custom names for individual tables.
- Select ORC as the file format.
Click Next.
Destination tab – Configuration
Configure the output file settings:
- File format: ORC
- Compression type: Snappy
Click Next.
Note: If you select Parquet as the file format and use a self-hosted integration runtime (SHIR), you may need to install Java on the machine hosting the integration runtime. The integration runtime requires Java to write data in Parquet format.
Settings tab
This tab provides additional configuration options for the copy operation, including:
- Data consistency verification.
- Fault tolerance.
- Logging.
For this example, we’ll use the default settings.
Click Next.
Review and finish – Review
Review the configuration to make sure everything is correct.
You can navigate back to previous steps and make changes if required.
Once you’re satisfied with the configuration, click Next.
Review and finish – Deployment
In this step, ADF generates a SQL script to create the control table.
Follow these steps:
- Click Download SQL script.
- Keep the wizard open.
- Execute the downloaded SQL script against the database you selected for the control table. I used SQL Server Management Studio (SSMS) to execute the script.
- Verify that the control table has been created successfully. In my example, the generated table name follows the
<schema>.<MainControlTable_jia>naming pattern. - Return to the Copy Data task wizard and click Finish.
ADF will now generate and publish three pipelines:
- One top-level orchestrator pipeline.
- Two supporting activity pipelines used by the orchestration process.

Step 3: Run the pipeline and verify the output
Now that the metadata-driven copy task has been created and deployed, let’s execute it.
- Navigate to the Author tab in ADF Studio.
- Locate the folder generated by ADF. Its name follows the
MetadataDrivenCopyTask_###_######naming pattern. - Open the pipeline named
MetadataDrivenCopyTask_###_TopLevel. - Click Debug to execute the pipeline.
You can monitor the execution status in the Output tab.
If everything is configured correctly, the pipeline should complete successfully. The execution time will depend on several factors, including the amount of data being copied, network bandwidth, and the integration runtime configuration.

Once the pipeline completes successfully, navigate to the configured destination location in ADLS Gen2 and verify the generated files.

As you can see, ADF generated five ORC files, one for each table selected from the source SQL Server database.
Conclusion
The Azure Data Factory metadata-driven copy task simplifies the process of building reusable data ingestion pipelines.
Instead of manually implementing metadata management, configuration retrieval, and orchestration logic, you can use the built-in wizard to generate the required pipelines.
This is particularly useful when you need to ingest data from multiple tables or build repeatable data ingestion workflows across different sources and destinations.
For scenarios that require more granular control over individual tables, the Configure for each table individually option provides additional flexibility.