
Published on: 3 December 2022
Author: Ramesh Kanjinghat
Azure Data Factory (ADF) supports parameterizing the pipelines so that you can create a generic pipeline and at runtime you can pass dynamic values to the pipelines. Almost all components in ADF support parameterization, such as Linked Services, Pipelines, Datasets, Data flows Activities. With parameterized pipelines you can use the same pipeline to move data between multiple sources and targets as long as the linked services can access these data sources.
There are multiple ways you can pass values to these pipelines when they are triggered. Such as,
- Create a blob created storage event trigger and pass the values in the blob. The pipeline can get the metadata of the blob and can use that metadata to connect to the storage and read the blob.
- Create a custom event trigger and pass values in the event grid message.
- Create a schedule or tumbling trigger and have the pipeline read the values from external sources like blob, table storage, sql server etc.
All these approaches require you to manage storing the values, add activity in the pipeline to read the values etc.
Metadata-driven copy jobs
Now ADF supports this out of box. This was available as a preview offering for a long time and recently this feature is generally available,i.e. Production ready. The basic idea is the same, where you will have a central storage where the metadata is, an orchestrator pipeline that reads the metadata from the storage and calls other pipelines to copy the data.
All this can be done in Azure Data Factory Studio using the new Metadata-driven copy task.
Now let's see how we can use this task to copy data from an on-premises SQL Server to Azure Data Lake Storage Gen2.
I assume you are aware of the process of creating linked services to connect to on-premises SQL Server and ADLS Gen2 storage. You may refer https://learn.microsoft.com/en-us/azure/data-factory/tutorial-hybrid-copy-data-tool to learn more about the process.
Step 1: Create linked service to connect to control table store
ADF stores the metadata in a control table.
- The metadata will be stored as a bunch of json objects in multiple columns in the control table.
- As of 2022-12-2 ADF supports below sources to store the control table
- Amazon RDS for SQL Server
- Azure SQL Database
- Azure SQL Database on managed instance
- Azure Synapse Analytics
- SQL Server
- Currently metadata-driven copy task doesn't support using parameterized linked services so, you have to create a dedicated linked service to connect to SQL server, even if it is the data source. I hope Microsoft fixes this soon.
Prerequisites
- Create linked service to connect to data source storage (SQL Server)
- Create a linked service to connect to data destination storage (ADLS Gen2)
Create Metadata-drive copy pipeline
Properties tab
In this set you configure your control table and the trigger type.
- On the ADF home page hit Ingest.
- On the Copy Data tool page select Metadata-driven copy task under Task type. (1)
- Either select the linked service for the control table sql server or (2)
- Create a Linked service, if you haven't created one already. (3)
- Provide schema (4) and name (5) for the control table.
- If you have an existing table then uncheck Create new table and select the table from the dropdown above.
The table textboxes (4 and 5) become a single dropdown when you uncheck Create new table.

- I have selected a scheduled trigger but you can select whichever schedule you need.
- Hit Next
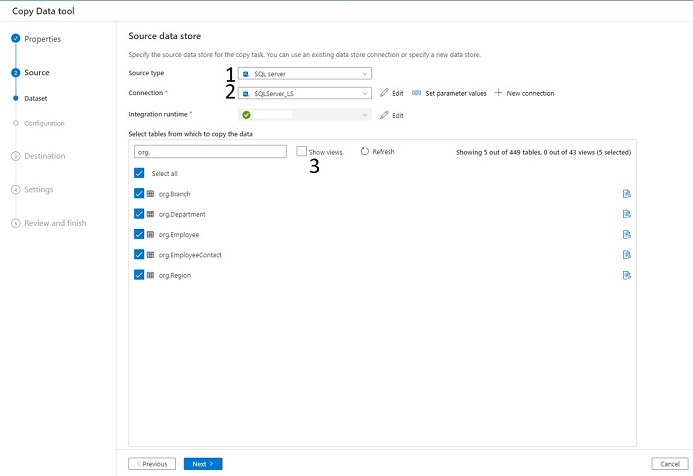
Source tab (Dataset)
Configure your source dataset.
- Select Source type as Sql server. (1)
- Select the pre-created linked service as Connection. (2)
- I have selected all the tables under the schema org.
- You can check Show views if you have to select views. (3)
- Hit Next
Dataset under Source tab
Source tab (Configuration)
- Pick Full load all tables
- Hit Next
There are 2 configurations
- Full load all tables This configuration copies all the data from the selected tables into the destination.
- Configure for each table individually This gives you much more control over what is copied to destination and how the data is copied. Some of the options are you can pick the isolation level, partition, copy delta based on a watermark column, and you can also preview the data.
I will soon publish another article about using Configure for each table individually.
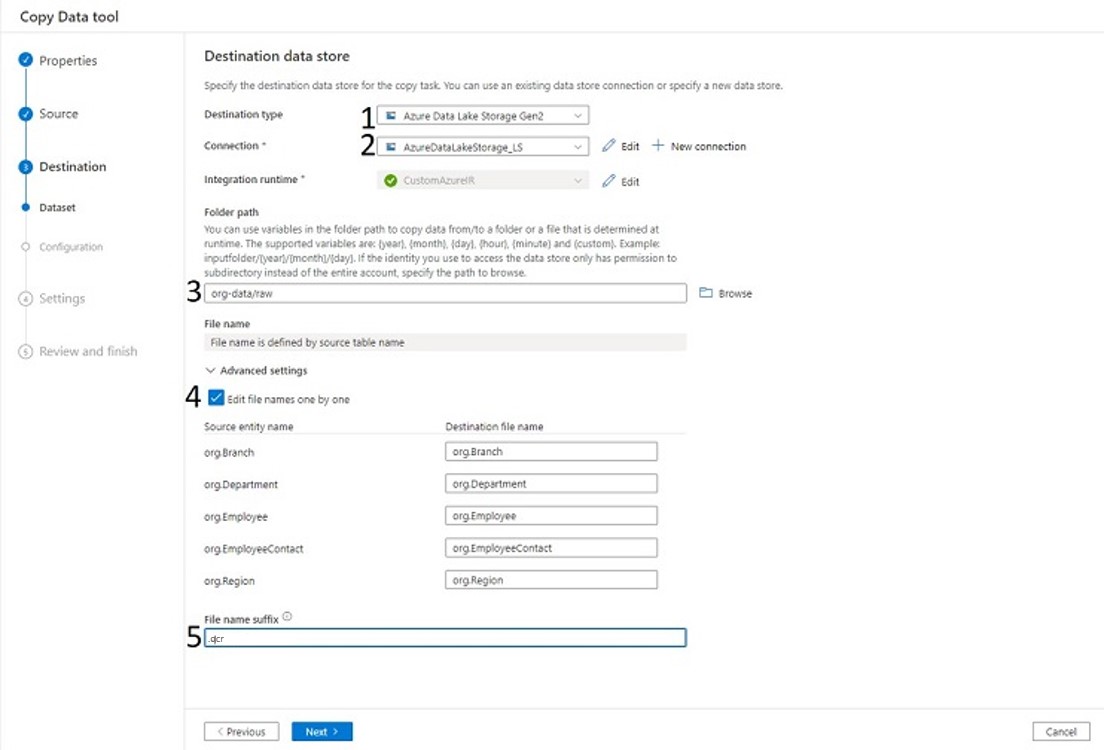
Destination (Dataset)
Configure destination dataset.
- Select Destination type as Azure Data Lake Storage Gen2. (1)
- Select the linked service you have created for the ADLS storage. (2)
- Browse and select the destination location in the ADLS storage (3)
- By default the table names are used to create the destination files but you can override that behavior by checking the box (4) and providing names for each table.
- I want to store the data in OCR format (5)
- Hit Next
Dataset under Destination tab
Destination (Configuration)
- Select OCR as File format.
- Select snappy as Compression type.
- Hit Next
If you select Parquet format and using a self-hosted integration runtime then you will also have to install java on the machine when the IR runs. IR needs java to export data in Parquet format.
Settings
This tab lets you configure more options such as, Data consistency verification, Fault tolerance, logging and others.
- In this case we will continue with default settings
- Hit Next
Review and finish (Review)
Review the settings and Hit Next, if everything is good.
You can go back and changes settings if required,
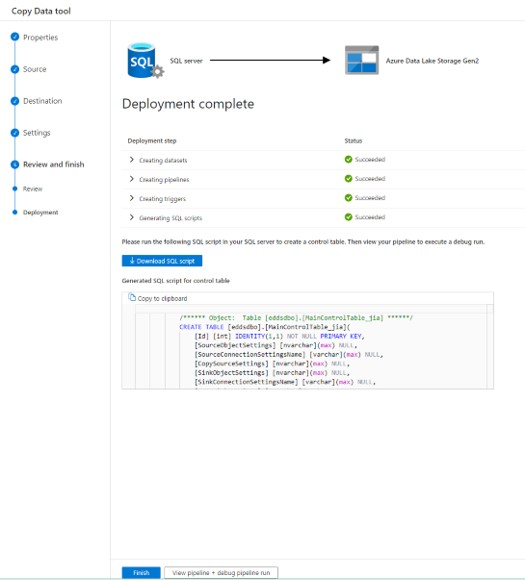
Review and finish (Deployment)
On this tab ADF generates a SQL script to create the control table.
- Hit Download SQL script.
- Don't close the Wizard yet.
- Run the downloaded script in your database. I used SSMS to run the script file.
- Check that the table <schema>.<MainControlTable_jia> is created.
- Go back to COpy task wizard and hit Finish.
- At this point ADF will create and publish 3 pipelines, 1 top level pipeline (orchestrator) and 2 activity pipelines.
Run pipeline and verify the output
- Go to the Author tab in ADF Studio
- You will see a folder created by naming MetadataDrivenCopyTask_###_######. Select the pipeline MetadataDrivenCopyTask_###_TopLevel and hit debug run.
- In the Output tab, below you can see that the pipeline is running.
- If everything is configured correctly the pipeline will succeed. The time it takes to complete the pipeline depends on the amount of data and network bandwidth and other factors.

- Once the pipeline successfully completes, check your ADLS Gen2 location for the OCR files.

We can see that there are 5 OCR files, one for each table we have imported.